Dimensioning software
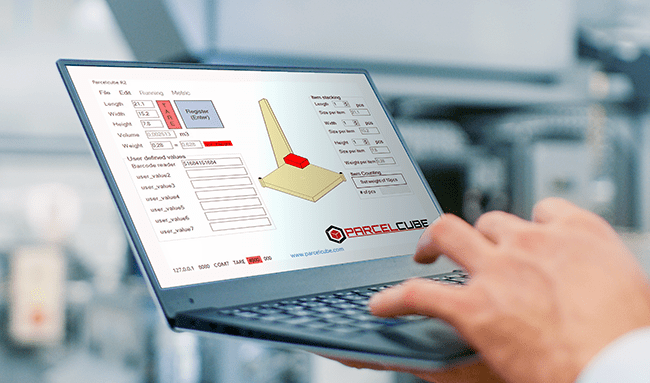
Our proprietary dimensioning software is essential for our Parcelcube dimensioning system. It comes free of charge with the Parcelcube hardware and is easy to install and use with our products.

There are 3 different ways to use our dimensioning software

Integrate it with your warehouse management system or enterprise resource planning system
The Parcelcube software is easy to set up and configure, enabling data exchange with your WMS. With 7 user-defined fields, you can add all necessary product information simultaneously, eliminating the need to switch between software or add data later.

Save regisered data locally on the computer
The data, provided in CSV or Excel files, can be processed later as needed. However, this method involves manual tasks, such as copy-pasting, which may introduce human errors.

Copy and paste data to a third party service directly after scanning
For example, if you run a small webshop and need to register the weight and dimensions of a parcel in a web-based service provided by your shipping company, our software can speed up the process. The ability to configure fields using different button combinations might sound simple, but sometimes simplicity is exactly what you need.
Parcelcube software is designed to seamlessly integrate with a wide range of ERP, WMS, Ecommerce, shipping, and delivery systems.
Some examples: SAP, Microsoft Dynamics 365, JEEVES, Consafe, Pyramid, DHL, TNT, nShift, Shopify, UPS, October, and Specter, among many others. Additionally, we can easily collaborate with any in-house developed systems you may have, ensuring a smooth and efficient experience across all your platforms.

Easy to use. The user interface is very straightforward and most features are understood just by looking at them.
Guides and tutorials
Here are some installation videos that might help if
you encounter any issues with the installation.

Parcelcube Vision
setup
02:58 min | Video tutorial

Parcelcube software installation
02:05 min | Video tutorial
Our most frequently asked questions
What kind of methods are available for retrieving data from the ParcelCube client software?
There are two methods:
- Webservice (Pull Data): This method pulls data from the ParcelCube client. You need to create software (web or desktop) that performs an HTTP Web Request to the PC where the ParcelCube client is installed.
- Remote Webservice URI (Push Data): This method pushes data from the ParcelCube client to a web service that is set up to receive the data.
How do I use the Webservice method to pull data?
Copy the code below to implement data pulling via Webservice from the ParcelCube client.
Example c# code:
---------------------------------------------------------------------------------------------------------------------------
Dim request As HttpWebRequest =
CType(WebRequest.Create("http://192.168.43.37:8080/"), HttpWebRequest)
// IP and port should be the one in the parcelcube config
Dim response As HttpWebResponse = CType(request.GetResponse(), HttpWebResponse)
' Get the stream associated with the response.
Dim receiveStream As Stream = response.GetResponseStream()
' Pipes the stream to a higher level stream reader with the required encoding format.
Dim readStream As New StreamReader(receiveStream, Encoding.UTF8)
'MsgBox(readStream.ReadToEnd())
Dim parcelcube_string() As String
Try
parcelcube_string = readStream.ReadToEnd().Split(";")
Catch
End Try
item_lenght_txtbox.Text = parcelcube_string(0)
item_width_txtbox.Text = parcelcube_string(1)
item_height_txtbox.Text = parcelcube_string(2)
item_weight_txtbox.Text = parcelcube_string(4)
response.Close()
readStream.Close()
---------------------------------------------------------------------------------------------------------------------------
parcelcube_string() has all the data, even though this example only uses 4 values. If you want the calculated volume parcelcube_string(3) will hold it.
Configure ParcelCube client Web Service
In the ParcelCube client software configuration screen fill in the following fields:
1 Bind to IP Address – This is the IP address of the PC that is running the ParcelCube client software (127.0.0.1 may be used for testing locally on the PC).
2 Bind to Port – Enter the port number.
* Note – If you have problems connecting, verify that the port entered is allowed in your firewall
Test Connectivity
To test connectivity on your network PC. With the ParcelCube client software running, enter http://192.168.10.80:8080 (substitute your IP and Port) using either Microsoft Internet Explorer or Mozilla Firefox on a network PC.
How do I use the Remote Webservice URI method to push data?
In order to utilize the Remote Webservice URI for pushing data from the ParcelCube client to your host application, a web service must be developed and running on your server, with a variable (e.g., named data) ready to receive the incoming data.
Example:
The web server that is running your web service has an ip address of 192.168.10.20 and uses port 9090.
Your web service name is pcdata and contains a variable that is expecting an http: get. The uri that you would put into the Remote Webservice uri in the ParcelCube client would be as follows:
http://192.168.10.20:9090/pcdata?data
ip address port webservice?variable
Configure ParcelCube client
In the ParcelCube client software configuration screen, fill in the following field:
• Remote Webservice uri
Usage
Once your web service is in place and the Remote Webservice URI is configured in the ParcelCube client, simply click the Register (Enter) button in the ParcelCube client software. The data will then be sent and retrieved by your web service in the defined format.
Example of data returned to your web service:
http://192.168.10.20:9090/pcdata?data=12;8.6;6.5;0.388194;1.5;4.041; ; ; ; ; ; ;12;8.6;6.5
What is item stacking and how do I use it?
Item stacking allows you to measure multiple small objects that are smaller than the minimum size allowed by stacking them. For example, if you have 200 business cards:
- Stack them along the height.
- Enter 200 in the "Height pcs" field.
- The „height“ field will display the total height of the stack, and the "Size per item" field under item stacking will automatically show the height of a single business card.
How do I measure oversized objects that don’t fit on the scale?
If an object is too large for the scale, you can still register its data:
- From the File menu, selectPause Serial.
- Manually enter the object's dimensions and weight. .
- Click Register to save the data..
- From the File menu, select Start Serial to resume normal operation.
What is the F9 configuration and how do I use it?
F9 configuration allows you to set up the scale software to emulate keyboard input of volume and weight data into any application. For instance, if you want to save measurements into an Excel file with columns for Length, Width, Height, and Weight:
- Configure the F9 as: l,t,w,t,h,t,W,lf
- When you press the F9 key, the Excel file will be populated with data like this:
Length Width Height Weight
23 41 12 0.77
43 23 12 1.33
How do I auto-calibrate the dimensions?
To perform auto-calibration:
- Login as Admin: Go to Edit > Admin Login and use the password dimwei.
- Access Calibration: Choose Edit > Auto Calibrate Dimensions.
- Follow Instructions: Follow the on-screen instructions and use the calibration object as per the assembly and installation steps.
- Configuration:
- Choose Edit > Configuration.
- Select High res and ensure that Smoothing is NOT selected.
- Click Save and OK.
- Calibration Process:
- Place an object of known size (e.g., 20 x 20 x 20 cm) on the scale.
- Observe the dimensions in the main window.
- Adjust dimensions in the configuration window accordingly. For example, if the width shows as 19.5 cm instead of 20 cm, increase the value by (20 - 19.5) cm.
How can I view CSV data from the scale?
To view the CSV data:
- Choose File > View CSV.
- The CSV file will open, showing the data in the format defined in the configuration form.
CSV File Format:
- Field 1: Date and time (variable size)
- Field 2: Length (variable size)
- Field 3: Width (variable size)
- Field 4: Height (variable size)
- Field 5: Volume (variable size)
- Field 6: Weight (variable size)
- Field 7: Volume Weight (variable size)
- Field 8-14: User Values 1-7 (variable size)
- Field 15-19: Item Stacking dimensions (Length, Width, Height, Weight) and Item Counting (# of pcs)
Each field ends with a semicolon except the last field, which ends with a CRLF (Carriage Return Line Feed).


